Friday, April 30, 2010

What's For DInner????

I found a really YuMmY reciepe for STUFFED PIZZA ROLLS...How did I know it was a good dinner???? The kids thanked me over and over for making it, now how often does that happen. SCORE ONE FOR MOM!!!!! I was so excited I thought I would share.


Here is how they turn out..you can put whatever you want inside, we used......


Pepperoni....DID YOU KNOW THEY HAD MINI PEPPERONI"S...how cool is that, they worked perfect.

To see how to make it, step by step go HERE...

GUSTARE LA CENA!!! ENJOY THE DINNER!!!

Monday, April 19, 2010

Making Breakfast Fun

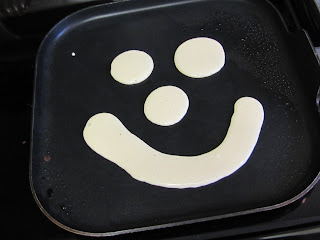
I saw this idea in a magazine, fun ways to make pancakes...so I we had to try it.


I bought the container at Walmart for 97 cents.


I cut the top to make the hole a little bigger...


Then fill with pancake mix....my favorite is Swedish Pancakes, they are thinner then most....


Then start creating...


I couldn't leave my husband out...fun for everyone!!!

YEAH!! I Love When A Craft Turns Out Great!!

I saw a fun way to paint with a BAR OF SOAP, yes you read it right a bar of soap. It was so fun and EASY (and it smells refreshing). Here is how you do it...


Get a piece of wood you want to paint..I had some vinyl lettering to put on so, mine was pretty big. The first step is on your blank piece of wood, randomly take your bar of soap and make marks on the wood. Here is a picture, it is kinda hard to see the marks, but look hard ;o) Where every you apply your soap, is where the paint will not stick to...


depending on how many colors you do, put soap on every layer of paint. I did two. So, I put soap on the plain wood and then did a coat of brown paint, let that dry and then in DIFFERENT spots put some more soap on the brown paint. So, by the time you do your second coat of paint you can rub off the soap and you will have the natural wood and the brown paint showing through. It gives it an old vintage vibe. SOOOO cute.


Do like my nasty towel I paint on every time, it is getting a lot of character ;o)


This what it looks like with the vinyl on....I LOVE IT!! Two more steps and you are done.


I sanded the edges ....


And then used Delta SEMI OPAQUE Burnt Umber paint and went around the edges. The paint has to be SEMI OPAQUE it makes it really light almost like it is watered done.


AND YOUR DONE....so easy and such a fun vintage look.


Any questions let me know.....HAVE FUN!!

Click Here for another tutorial how to do it...

Thursday, April 15, 2010

Cute Head Band

I found this cute head band that someone had made on the Internet, I feel so bad I can't remember the site, but I knew I had to make one. Here is how it is done.


I bought these disc at Michael's..I used the 1 1/2 inch discs, they did have smaller ones if you wanted...


Then find the material you want and cut out a square to cover the disc....


Then just hot glue the material to the disc...


Glue the disc's in a row on a ribbon that has been measured to fit your child's head.....


I put some felt over the ribbon to cover up the back of the disc's, makes it looks prettier ;o)


I sewed on the elastic to make it stretch a little, it will fit more snug on your little ones head.....


The final product....so cute and EASY!!!

Make A Dollar Frame...AMAZING!!

I love the $1 frames and Michael's, you can do sooooo many fun things with them. I used Mod Podge and put some great scrapbook paper on my dollar frames for my sis-in-law for her birthday, they turned out really cute!! I didn't get any pictures making these but here is the end result....


I Mod Podge the paper on, then sanded the edges using my Dremel tool. Then distressed with brown SEMI-Opaque paint. After that was done I drilled two holes in the top to lace the ribbon through., SOOO easy and such a great present.


PRICELESS!!!

Hair Clip Holder

My girls recently got into wearing hair clips, I had them laying all around the house. So, I decided to make a hair clip holder.
Items needed:
-ribbon (I used 2 yards)
-hook ( I am not sure what the correct name for these are..but I have a picture of them)
-hot glue gun


Here are the hooks I used...I got mine from Walmart hanging by the buttons....


Ribbon, I used 2 yards.


First take your ribbon and feed it through your hook and glue the edge....like so:


Then take the bottom and fold it over and glue, so you don't have any raw edges.


Then add your clips and you are done....SO EASY!!! It is a cute, fun way to hang your clips.


Mother-in-law Fun Easy Birthday Present

It was my Mother-In-laws birthday and I had NO idea what to get her. We had recently just got a well over due family picture taken. So, I decided I wanted to do something with that picture. I pulled out the Mod Podge and went to work.

Items you need:
*A favorite picture (any size)
*Piece of wood that will fit the picture
*brown paint to show the distress...my favorite is by Delta (Burnt Umber..SEMI opaque)
*Your favorite color of paint
*Mod Podge
*sandpaper (I love to use my Dremel tool)
*picture hanger


Paint your wood first, I left just a small margin to show the paint color. Then cover your picture with Mod Podge. Test the corner of your picture first to make sure your ink on the picture isn't going to smear. I got mine developed at Costco and had no problems. That was a great idea from Amy at MOD PODGE ROCKS. When doing the Mod Podge I like to do brush strokes going all the same way, then after you apply it all over, take your brush and go the opposite way, it makes it look like it has a canvas feel to it.


After many coats of Mod Podge, sand the edges. You can use regular sandpaper, I love to use my Dremel tool, it gives it a little more character.


Then use your distressing paint to give it a vintage look. I used Burnt Umber SEMI- Opaque.


Just put a picture hanger on the back and your done. Fun and simple. She loved it.


It was a fun gift to make that can go on a wall of just leaning up against something....