Saturday, December 11, 2010

I'm aLiVe!!!!

I am still alive. My family and I just moved. It has been a complete whirlwind, but we are unpacked and moved in...FINALLY!!


WOW!! There has been so many fun things on the BLOG lately with the fun holidays. I have a list of crafts to do that is so long..I can't wait to show them to you. But, for now check out these AmAzInG Christmas mantels. I have my first mantel, I can't wait to decorate it like these...jump on over to  
BLUE CRICKET DESIGNS and look around at all the mantels at her link up party. BEWARE you will get lost and spend an hour OOOHHHHing and AWEing over EVERYTHING!!! Thanks for stopping by, I hope to get crafting soon!!!


Wednesday, October 6, 2010

The CuTeSt Pillow EVER!!!!


Oh my GoOdNeSs!! I am in LOVE with this pillow. I found it over at 
Look how cute.
Click HERE for a great tutorial.
I can't wait to make one.


Wednesday, September 29, 2010

My FaVoRiTe Halloween Saying...

I love this HaLlOwEeN saying, I found this cute and easy sign over at


I have got to make me one of these....I LOVE IT!!!


Saturday, September 25, 2010

Re-purposed Tee (My FaVoRiTe)

I saw this shirt on this great Blog, "ThE PLEATED PoPpY", I made me one and wear it all the time and just made two for birthday presents. It is so fun to make....for a tutorial click at the bottom of the post.
Here are pictures of the shirt I made, with a few pictures of how to make one yourself.


Your first step is to get a plain tee, I found this one at Walmart for $6.00 dollars, you will need another tee to cut up also, I just used an old tee that was stained.


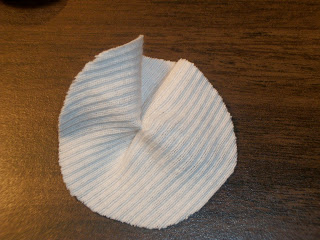
With my extra tee, I cut out a variety sizes of circles. I used two types of material, just a regular knit shirt and then I cut up an old ribbed tank. It gave it a great contrast.


After your circles are cut out, you need to take a tuck in the middle to make it look like a flower. You can do this by hand or with your sewing machine. Fold the circle in half....


Then in fourth's...


Just take a quick stitch across the point of your circle....


Here is what it should look like....


After all your circles are down, hand sew them on your shirt...... after that is all done take your sewing machine and make lines all over the flowers to keep them in place.

NOW, I made two of these shirts for presents and didn't take a final picture...DuH!!! 

Jump over to "The PLEATED PoPpY" and check out her great tutorial and final product, click HERE .....thanks for stopping by.....


T-shirt Scarf

Do you know when you see an idea and you have to make right then....I had to do that when I saw this fun T-ShIrT ScArF over at "Shwin & Shwin" ....so fun and EaSy...here is the one I made...for a step by step tutorial click HERE...have fun.


Seriously, do you think my child is camera shy????


Friday, September 10, 2010


A
HuGe shout out to Stacie over at CrEaTiVe CraTe for featuring my shirt on her blog. Go HERE to check it out!!

AmAzInG ChIcKeN ReCiPeS


I have been trying new recipes lately and found a few recipes on this 
great blog SiStEr'S StUfF I wanted to share. The first 
was "Hibachi Chicken" it was really yummy!! Defiantly make the dipping 
sauce, sooo good!! Go HERE to get the recipe. Another recipe that I LoVeD 
was "Grilled Bruschetta Chicken" it was so good and really 
tender....go HERE to get the recipe. 
Thanks Whitney & Alish for the amazing food.

Thursday, September 9, 2010

Laundry Room Sign


I saw the CUTEST idea for your laundry room over at
          "LOVE STITCHED"..she came up with such a great idea to REMIND you to empty your pockets before you wash. I can't count how many times I have had chap stick, trash, candy and golf tee's in my laundry. No more..I can't wait to make this..
check out Brittany's tutorial HERE.

Tuesday, September 7, 2010

Cute Autumn Decor!!


I just came across this CUTE idea at "A DIAMOND in the STUFF" and fell in love with it!! So, cute and inexpensive.
Courtney got all of these frames at the dollar store and then just used scrapbook paper for the background and letters....SO CUTE!!! For more details go HERE to check it out!!

Wednesday, September 1, 2010

Fun, Repurposed Shirt

I saw the cutest shirt on this girl yesterday, that she has bought at Old Navy and knew I had to make it for my daughter!! It was so fun to make. The first thing I did was bought 2 shirts that were the same color. I found them $3.00 dollars, love that!!


I cut the first shirt in one inch strips around the shirt.....did as many strips as I could..


Then I made the strips into a ruffles....


After the ruffles are made, I pinned them onto the shirt, creating hearts..... this was so helpful to do, so you had a design to sew on...


This is what it looked like before I sewed it on....then the fun part...SEWING


I just followed my lines and sewed the ruffles on to my shirt....so fun and easy!!


The final look on my beautiful model....


close up..this is after it has been washed, so the ruffles have curled in a little.

Thursday, August 26, 2010

Fun, Kids Chore Charts!!

I have been wanting to make my kids chore charts, but I wanted them to help. So, I decided on an idea, that they got to help paint and pick out the paper. They had so much fun. AND they have worked so well, they love them.

I got a metal shingle from HOME DEPOT in the roofing isle, I believe it was 8 X10. I then MOG PODGED there favorite piece of paper on to the metal shingle, which will create a magnet board. I had some wood laying around so, I just cut it to size, let them paint the wood to match there paper and it was done. I found some great magnet clips at the dollar store that help clip there TO DO chart on the magnet board. After I made there chores, laminated and added magnets to the back on the computer, they were set!! It was such a fun, easy way to have them help and get excited about doing CHORES!!!


click on picture to enlarge

Thanks for stopping by!!!

Tuesday, June 1, 2010

Photo Key Holder...So Cute!!


Check out this cute Photo Key Holder...that I came across @ Sweet Daisy Designs {via: The Creative Crate}! Stacey used a piece of plywood for the base...and used Mod Podge to glue her photos to 4- 5x5 canvas that she bought @ Michaels for $1 each!! LoVE it!!
For a complete tutorial on how she made this...go HERE!
I can't wait to make one!!

Friday, May 28, 2010

Teacher Appreciation Gift

Here is what we did for my daughters teachers to tell them "THANK YOU". We made a little movie box for them. We added snacks and a Redbox envelope (that I made) with a dollar in it to rent a movie on us...they loved it. Fun and easy!!!


Thursday, May 13, 2010

A Fix..For Cold Fingers and Otter Pops!!!!

My kids (and husband) LOVE, I mean LOVE Otter Pops in the summer, thank goodness Costco sells them in a case of 200!! BUT, the problem is their little fingers get so cold eating them. My sister saw this idea on this BLOG and I was sold. First you need some fleece, my Mom had this fleece at her house we used....


I just measured it around the otter pop to get the right size and cut a square.


Then fold it in half, sew the side edges together. I did something a little different then the BLOG we read. I left the bottom open so it could move up with the ice.....(I am so smart ;o))


And there you have it a sweet little holder for your kids otter pop...NO MORE COLD FINGERS!!! YEAH!!! Let the Otter Pops eating begin ;o)

Cute Flower Clip Hanger/Display

My sister and I found this really cute way to hang her cute flower clip on a blog (we can't find the link to the blog, if this is your idea let me know, I would love to give you credit). My sister I guess I can say, has become OBSESSED with cute clip flowers to put in her (unborn) baby girls hair ;o) When she arrives she has flowers to match every outfit. I can't wait!!! Anyway, we got together and made this cute display canvas for her.

First we bought a 16 X 20 canvas at Michael's. And then my sister painted it brown to match her little girls nursery. After it dried (of, course) we laid out the ribbon across the canvas, the way she wanted it to look. She added some really cute more decorative ribbon to give it some fun character (the orange and blue ric rac looking ribbon). After that was done we just stapled them with a electric staple gun ( my fav), you could of course hot glue them if you would like...it was so fun and SO easy to make. After we were done, we just stapled some extra ribbon on top to hang it from a nail. It's ready to go, just add the cute clips and you are DONE!!!


Sorry this is the wrong way..OOOPPPPSSS (just turn sideways)


The finished product....isn't that adorable!!!

We found the idea on

Friday, April 30, 2010

What's For DInner????

I found a really YuMmY reciepe for STUFFED PIZZA ROLLS...How did I know it was a good dinner???? The kids thanked me over and over for making it, now how often does that happen. SCORE ONE FOR MOM!!!!! I was so excited I thought I would share.


Here is how they turn out..you can put whatever you want inside, we used......


Pepperoni....DID YOU KNOW THEY HAD MINI PEPPERONI"S...how cool is that, they worked perfect.

To see how to make it, step by step go HERE...

GUSTARE LA CENA!!! ENJOY THE DINNER!!!

Monday, April 19, 2010

Making Breakfast Fun

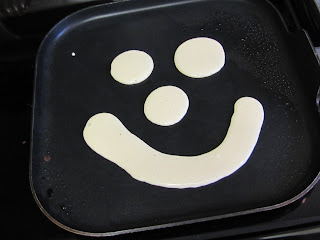
I saw this idea in a magazine, fun ways to make pancakes...so I we had to try it.


I bought the container at Walmart for 97 cents.


I cut the top to make the hole a little bigger...


Then fill with pancake mix....my favorite is Swedish Pancakes, they are thinner then most....


Then start creating...


I couldn't leave my husband out...fun for everyone!!!